Hello readers. Welcome again to technology sage. Today we want to look at How to Disable Windows defender from Running on Windows 10 PC/Laptop computer. Windows Defender is a default windows antivirus that comes with windows operating system. This antivirus is always good and effective for it blocks malware, anti-ransome and keeps your computer in a very healthy condition and free from viruses. Windows defender also automatically disables itself when you install another third party antivirus such as Bit defender, Karspersky and any other. Windows defender also automatically enables itself whenever you uninstall third party antivirus.
You might ask why you should disable Windows Defender antivirus when it has such nice features and maximum protection. There are situations where you might really be compelled to disable Windows defender. Windows defender is a built in antivirus and it is very difficult to completely remove it. Windows defender also, on some occasions find your other important files as viruses and therefore automatically deletes them. Windows defender also many times identifies some types of .exe file extensions as viruses and deletes them without your knowledge. You might want to run programs that are tagged as malware by Windows defender. With this reason, you might really find yourself in situations where you don’t have any other option other than disabling Windows defender. Let us now look at How to Disable Windows Defender on Windows 10 PC/Laptop. Read also: How To Turn on Bluetooth on Windows 10 PC/Laptop
How to Disable Windows Defender From Running on Windows 10 PC/Laptop
If you have reached a point where you really want to disable Windows Defender, follow the following procedure on How to Disable Windows Defender on Windows 10 PC/Laptop.
- Press the windows key on the keyboard and the R letter key simultaneously. That is, Windows key+R. This will open the command line.
- In the command line, type gpedit.msc and click OK. This will open the Local Group Policy Editor panel.
- Now, follow the following link through the files:
Computer Configuration > Administrative Templates > Windows Components > Windows Defender Antivirus
On the right hand side panel, double click Turn Off Windows Defender antivirus

In the next screen, select the DISABLE on the left side to disable Windows Defender from running on Windows 10. You can repeat the procedure the next time you will want to enable Windows defender again.
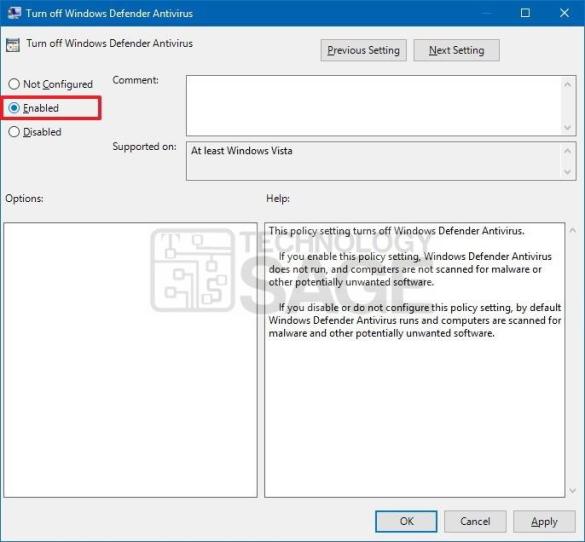
Now click the OK button and the APPLY then reboot your computer to effect changes.
Conclusion:
The above procedure will permanently disable Windows defender from Running on your windows 10 computer. Before you disable Windows defender from your computer, always make sure that you have other antivirus you will install to protect your computer from malware because without an antivirus program running on your computer, your computer will now be vulnerable to virus infection. Lastly, remember to follow the same procedure to re-enable Windows Defender again on your PC.


