Today I show you how easy it is to use BlueStacks behind a proxy network. BlueStacks is an android simulator that brings Android applications to computers and Mac. It has been that we are having problems accessing the proxicated network on the app. I experienced this problem and so I embarked on a such on how to Use BlueStacks Behind a Proxy network or rather use bluestacks with a proxy network. We at Technology Sage found the solution to this. So here is a detailed step by step procedure of how to configure your bluestacks App player and the apps therein to use a proxy network.
Requirements to Use BlueStacks Behind a Proxy network
- Download and install Bluestacks app player from their website.
- Download and install another software called Proxycap.
Configuring Bluestacks to use Proxy Network;
After installing the proxycap you may be prompted to restart your pc, in that case, do so before you start configuring it.
STEP 1:
a)
In order to Use BlueStacks Behind a Proxy network, we have to consider two sets of connections, that’s the HTTP and the HTTPS connections. Let’s get started with the HTTP. In the bottom right corner of your computer or laptop, you will see the icon of proxycap, right click on it and select configuration In the popup menu that will appear as shown below.
In order to Use BlueStacks Behind a Proxy network, we have to consider two sets of connections, that’s the HTTP and the HTTPS connections. Let’s get started with the HTTP. In the bottom right corner of your computer or laptop, you will see the icon of proxycap, right click on it and select configuration In the popup menu that will appear as shown below.

A pop up dialogue box should then appear
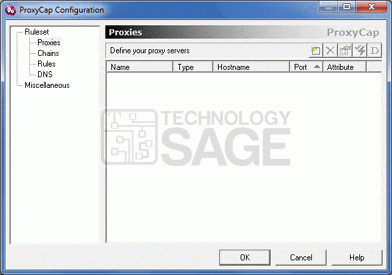
 Under the Proxies category, press the new button on the toolbar. The button looks like
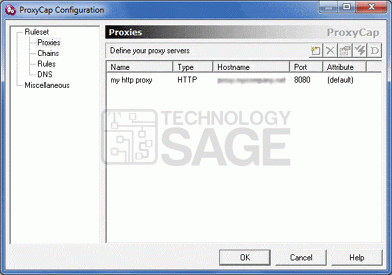
Select HTTP under the Type drop-down list. Fill in the specific details about the proxy you are using and in case it
requires authentication, specify the login details, Enter the name Of the wireless network under Display name, it can be any name. Then press the OK button.
requires authentication, specify the login details, Enter the name Of the wireless network under Display name, it can be any name. Then press the OK button.

When You press OK, you should be able to see that the proxy has been added as shown below,
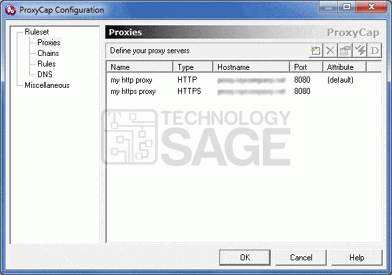
The next step is to do the same but now under proxy type specify the HTTPS. Click on the new tab and enter the proxy server and the authentication the same as in step 1, the only thing that changes is the proxy type. Then press OK and you should see it too added in the list of the proxies we had before. It should appear as below,
STEP 2:
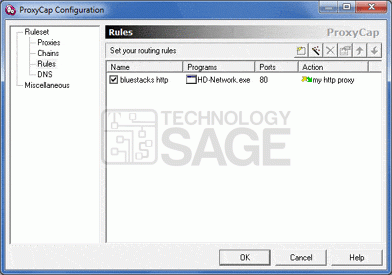
The next step is to create proxycap routing rules for BlueStacks app player. In relation to STEP 1, we will also create two rules, the one for HTTP and HTTPS. Let’s get started with the one for HTTP.
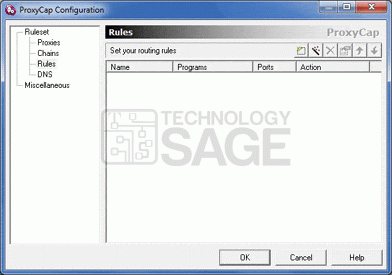
Under the Rules category, click the new  button on the toolbar,
button on the toolbar,Under the Rule Action section, select the display name of the HTTP proxy server from the drop-down list, the name you used in step 1

Under the Program tab, click Specify, then click the Browse button denoted by 
Navigate to the folder where you installed BlueStacks, usually It is located in local disc C, Program Files or in Program Files (x86) on 32 bit based windows and under program files x64 for 64 based Windows.
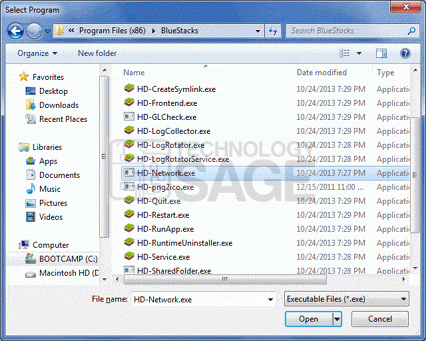
Then select the HD-Network.exe. Press the Open button.
Under the Destination Port Range section, click Specify, then type 80 in the first port field. Give a name of your choice to the rule in the Rule Name section. Press the OK button.

The rule should appear in the list as below,
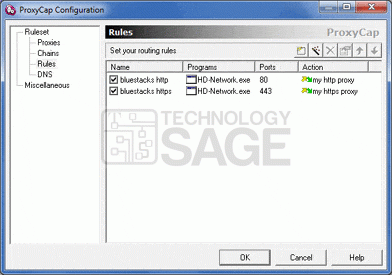
We then add one more rule for HD-Network.exe to redirect through proxy the same way but In place of the HTTP proxy, specify the HTTPS one and In place of the port 80, specify 443. It should appear as below,
STEP 3:
CLICK OK, to save the configuration and start enjoying the Android experience on your PC. With the settings above, you will be able to Use BlueStacks Behind a Proxy network.
Now that we know how to use BlueStacks From Behind a Proxy network or rather use bluestacks with a proxy network, I would advise that you remember to put the correct details for your proxy network in the fields that require such information. The login details should also not be neglected in case they apply for your network. The video below shows all the steps in details. Feel free to watch for clarifications.
https://www.youtube.com/watch?v=-fbCBeTuQR8
ALSO CHECK OUT:
How to Watch DSTV online for free from PC or Laptop, Blackberry and Android Phones
Simple Home Made Renewable Electricity
How to Recover Data on a Formatted Hard Drive
How To Recover Deleted Messages On Android Phones


